
How to Create a Testimonial Slider in Squarespace

So, it’s getting to the point where you’ve got a pretty nice Google Sheet filled with glowing reviews? Sweet, amazing work! If you’re looking for a handy Squarespace hack to add a rotating testimonial slider to your website to show off your reviews, this tutorial is for you. It’s super easy to do but the result is seriously effective.
Using testimonials on your website is a great strategy for converting your audience into paying clients and customers. That means more people booking your services, buying your products, signing up to your class - or whatever it is that you do.
Here’s a peek at my example to give you an idea of what yours could look like…
Creating a testimonials Slider
So to summarise: We’re going to use 2 steps to complete this method. The first part is to create a blog filled with your testimonials. Then we’re going to add in a summary block to create the slider on your website.
You might also like: Testimonials for Your Business Website
This will work for Squarespace 7.0 and Squarespace 7.1.
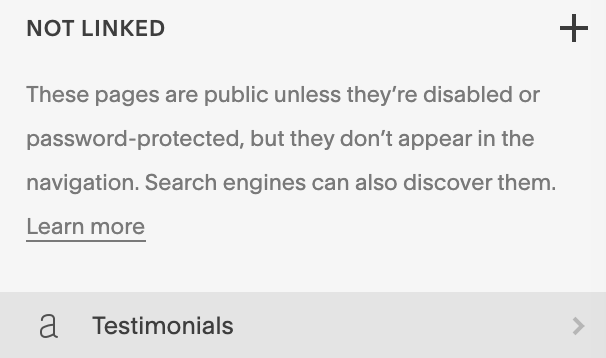
Step 1: Create a new blog page. This blog will host your testimonials not your other content. I’ve named mine ‘Testimonials’ in this case. Head to the + button on the not linked section and click ‘blog’.
Step 2: Within your new Testimonials blog, create a new blog post.
Step 3: Add in your testimonial content to your new blog post.
There are two ways to do this, one using the Title and the other using the Excerpt.
If you use the Title, your text will display at the top of the testimonial.
Under “options”, add in your testimonial to the excerpt section of your blog. Use the styling and heading settings to design the look of your testimonials. It’s also a good idea to add in names to give the testimonial personality. You could even leave a link to their site or social media too.
If you want add an image to your testimonial, upload a Thumbnail Image.
NOTE: Anything that you write in the main blog body will not be displayed in the testimonial slider.

Step 4: Save and publish your post.
Repeat steps 2-4 for the other testimonials that you would like to add to your slider.
Step 5: Head to the page you’d like to add in your slider. Add in a Carousel Summary Block where you want your slider to appear on the page.
For my example, I’m going to add mine to this blog post. Yes, that’s right. You can add these sliders into blog posts too!

Step 6: Under the ‘Content’ tab, select which blog you want the slider to pull from. In my case, it’s the Testimonial Blog.

Step 7: Under the ‘Layout’ tab, use the following settings instructions - or feel free to customise these to match your needs!
Header Text: Leave blank
Aspect ratio: Auto
Items per row: 1
Step 8: Under the ‘Display’ tab, follow these settings instructions - or feel free to customise these to match your needs!
Check: Show Excerpt
Leave all the others unchecked (unless you want your title to be shown then check ‘Show Title’, or your Thumbnail image, in which case check on ‘Show Thumbnail Image’)
Choose ‘none’ for the Primary and Secondary Metadata
Top Tip: You can use ‘Category’ and ‘Tags’ filters to separate out different testimonials. So if I want to show only my website testimonials on a certain page, I could tag the blogs with ‘Website’ and then pull across testimonials from that tag.
Step 9: Click save and put your feet up!
So, there you have it. It’s such a simple hack but one that is oh-so effective. Let me know if you have any questions!


Eleanor will guide you effortlessly through the process to create your vision perfectly.
- Anne